

I cut pictures from magazines and catalogs and paste them into notebooks. I use these pictures to copy from for blog tutorials.
I've been wanting to make this for you for awhile. I haven't because I wanted to use basswood. I receive many e-mails asking why I only use card stock and mat board. I tell them that those materials are easy to get and cut without buying machines. The tutorials are accessible to more miniaturists.

This time I decided to go ahead and make this bench from basswood. If you've been following the blog for awhile you should be able make the bench using mat board, too. I will try to remember to make suggestions along the way for you.
To begin any project that I am copying from full-size I write down the scale conversions for quick reference.

I draw two views of the piece I will make, front and side. When I am drawing I am using the 1 inch scale measurements, the drawing is the same size the finished piece will be. Since the drawing is the same size I can check it for measurements as I go for cutting and gluing.
The drawing gives me an idea of the real size. If you look closely at the drawing on left you will see that I shortened the length of the bench. I cut the drawing in half and overlapped the pieces to get a length I liked. I make notes on board thickness and other things on this drawing. I also keep this drawing for future reference. This is all done with a ruler, I'm no artist.

This is my cut list. I list the sizes of the pieces I need to cut and how many. This list is important because I group together the pieces that have the same measurement, whether it be length or width. It is much easier to set my table saw once and cut everything I need at that measurement than to come back and try to re-set the saw to the exact same measurement. It can be done, but why?

I then go over and write down how I am going to cut and then glue the piece together, in other words the steps I am going to follow.
To do this I picture the procedure in my head. I do make changes along way because I will forget things.

This is my little table saw from Micro-Mark.
I've taken the fence off for the first cuts because the posts are too long, longer than the table saw top. I've screwed a piece of wood to the miter guide.

I've clamped a scrap piece of wood at the length I want the posts cut.
Why don't you mark and cut each one? Because I'm not a machine and my marks and cuts will vary. Setting the machine this way will make my bench set level.

When you cut your posts don't cut through the added wood you screwed to the miter guide. You will cut it a little bit but not through.

I have my four posts cut.
These posts are from 3/16" x 3/16" square stock. Michaels or Hobby Lobby carry basswood in various sizes. Hobby Lobby is better at keeping a good supply of basswood.
Two posts are cut 2 5/8" and two posts are cut 5 1/8".
Note: I have no picture of this but I used a small file to shape the top of the tall back posts. I filed about a 45 degree angle on the four edges of the top ends.
For mat board, cut and glue three layers together to get 3/16" thickness. When gluing line up your cut edges together. To cover the cut edges glue card stock over them.

The next pieces cut are from 3/32" thick stock.
Cut a strip 3/8" wide at least 12" long.
Next cut a strip 1/8" wide. Set this aside.
Keep the saw set at 1/8". From 1/32" thick stock cut enough strips to add up to 56". This is for the lattice back. Fifty-six inches is an over estimation but it's better to have too much than not enough. Set these pieces aside.
Back to the 3/8" wide strip that you cut earlier, cut three pieces 3 1/16" long and cut two pieces 1 1/8" long. These pieces are the apron and top decoration.
With the saw still set at 1 1/8" and using the 3/32" thick stock that you cut one strip of, cut two pieces. These are the bottom braces.
For mat board glue two layers together to for the 3/32" thickness. Yes, it will be a tiny bit thicker but not so much to matter.

Here are Nancy's patterns. She drew two of the decorative top for you to choose from. These are so much easier to copy from than my drawings, thank you Nancy.

Print out Nancy's patterns according to the directions from the "Things to do, Things to see" list, HOW TO RE-SIZE THE PATTERNS.
Print onto paper.
Cut out the top decoration piece and trace or glue onto one of the 3/32"x 3/8"x 3 1/16" pieces.

I am going to cut this piece out using my scroll saw.
It's a small piece and hard to handle.
Using a little yellow carpenter's glue (YCG), glue a piece of paper to a scrap of wood larger than the top decoration. Glue the top decoration to the paper with YCG. Just enough to make the wood stick, this isn't permanent.

Just a note: A scroll saw has a large hole in the bed, it's large for cutting miniatures. I usually have a piece of wood cut the same shape as the bed with a tiny hole, big enough for the pin end of my blade to go though, clamped onto the bed. This helps a great deal. I just wanted to pass this on for people new to scroll saws.
I am showing the assembly about to be cut.
A little trick that you can do is to drill out the hole in the middle of the decorative top. The hole will be perfect and all you have to do is cut the top edge.

I've made the top cut. Wrap sand paper around a toothpick and sand the middle notch smooth.
Note: I haven't mentioned sanding but I hope you are sanding the surfaces of the wood smooth, not enough to change the dimensions, just smoothing.

I've separated the decorative top from the scrap.

I'm using squares and rulers to try and keep everything square and level when finished.
I am marking where to glue the aprons and bottom braces.
On the long back posts mark where the short front posts end. At the bottom where the bottom braces will be glued, measure 3/4" from the bottom of the posts and mark all four posts.

I have my marks made and I am gluing using YCG the first apron on the side. You see my square? Glue the apron onto the front and back posts, the apron is flat on the table this leaves an edge on the posts.

Glue the bottom braces in between the front and back posts at the bottom marks.
Please leave this to dry. This has been butt glued, not much surface, it needs time to dry before you handle it.

I am beginning to glue the front and back aprons on. I said we had butt glued and I don't like doing that. On the left of the picture you will see some 3/16" x 3/16" square stock cut at about 1/4" long, you will need to cut four of them.
For mat board you could use your square and draw and cut out two squares. Cut the squares in half from corner to corner. Glue the triangles into the corners. This will stabilize the corner for you.

If full-size furniture the aprons would have dowels or biscuits inserted into the ends and into the posts. We could dowel but this is easier. After you have glued one apron onto the post, note the front edge left on the post, glue one of the blocks into the corner. This will add some stability to the bench.

Can you see that I've glued the back apron flat against the table top? I'm not leaving the edge that the sides and front have.
Glue all four blocks into the corner.

Measure 1/8" down from the top of the posts and glue the decorative top into place.
Tigger says HI! And let this assembly dry.

I set the table saw to 3 3/4".
I then cut from 3/32" AND 1/16" thick stock one piece each.
For mat board use two layers for the 3/32" thickness and one layer for the 1/16" thickness.

Set the 1/16" thick piece aside for now.
Set the saw to 1 5/8" and cut the table top.
Center the top onto the bench and mark where the back posts are. We are going to notch out to fit the back posts in.

Use the scroll saw to cut the notches. I usually cut the notches a little small and cut or sand a little bit more to fit the posts in.

The back of the bench.

Apply glue to the top of the aprons and clamp the table top on. Let this dry.

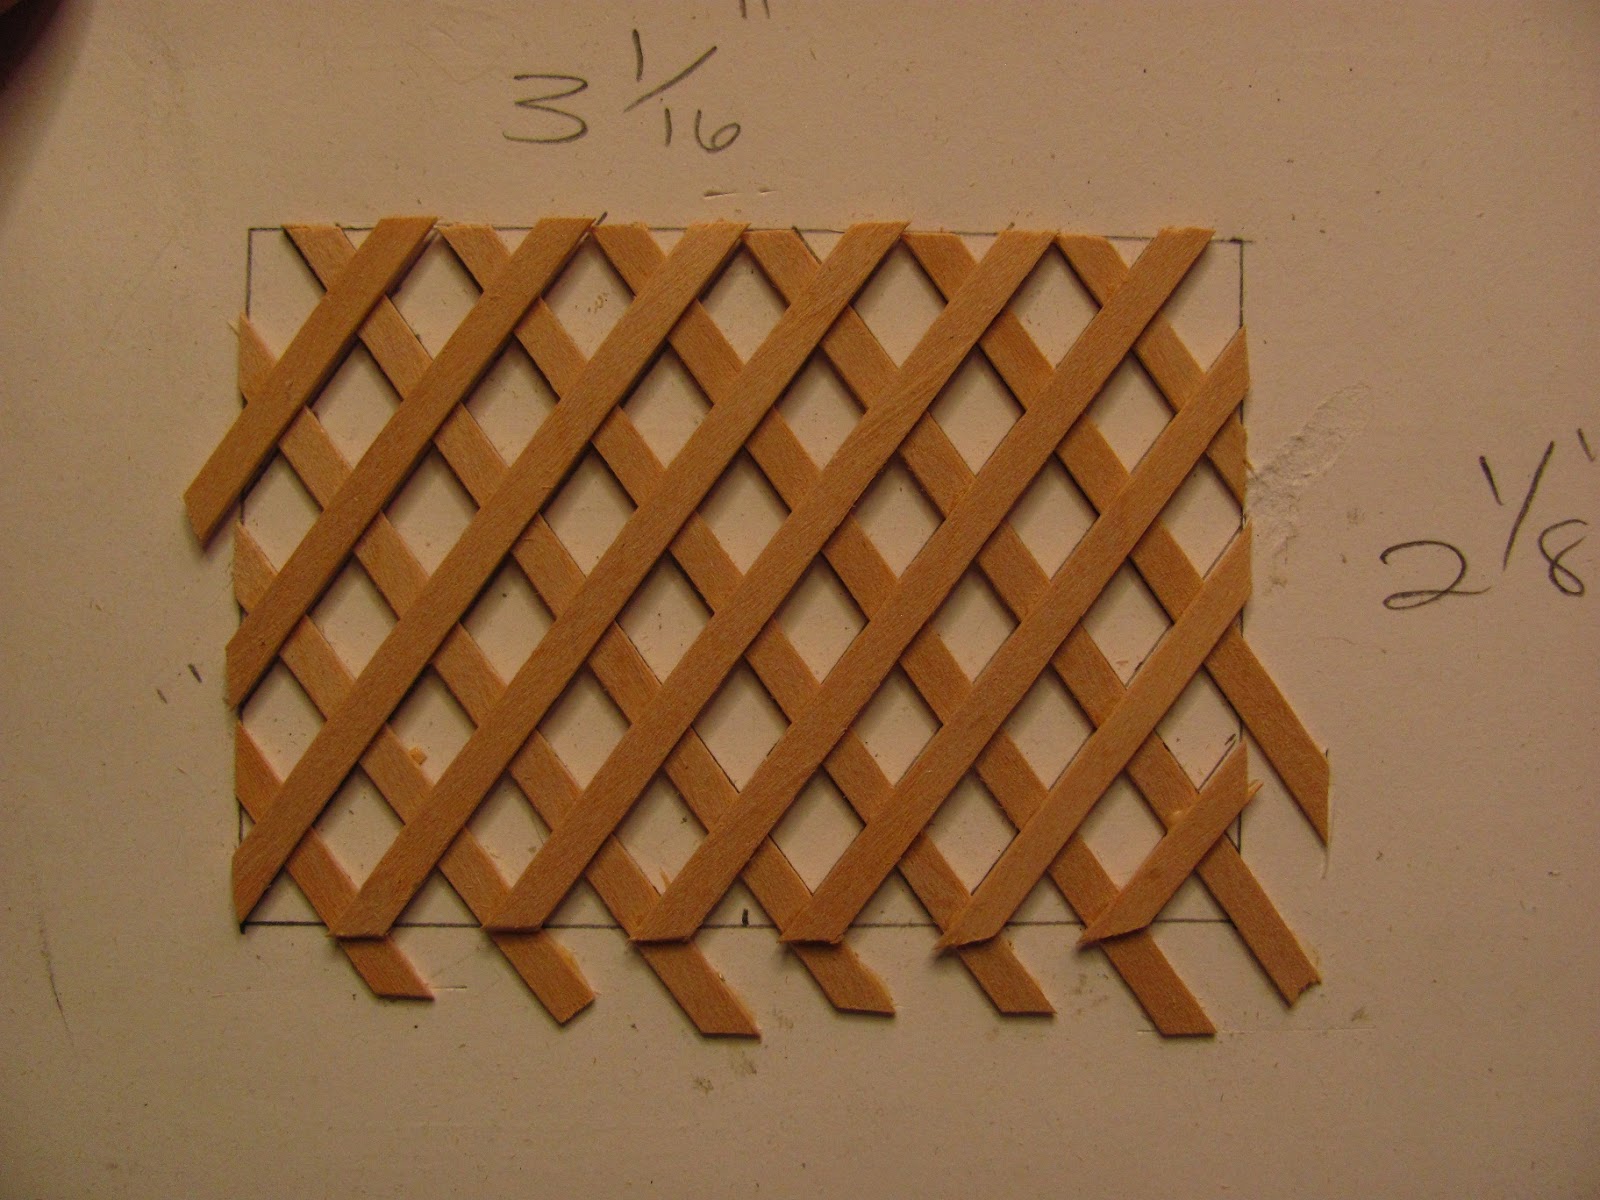
The opening in the back should be 3 1/16" x 2 1/8".
Draw a rectangle that size and mark the center. Draw lines, 1/8" wide for the slats with 1/4" between.

Use your craft knife to follow the angle and only glue, a tiny bit, one end of the first layer of slats.
For mat board, Michaels has Heavy Weight Poster Board that would be great to use for the lattice.
Glue the second layer of slats onto the first layer where they cross.
Let this dry.

Remember the 1/16" thick piece you cut the same size as the table top?
We are going to cut this piece into strips 7/32" wide, cut four of them.
Glue the first two on next to the front and back posts.

Glue the other two onto the bottom braces with equal space between.

Cut the lattice from the paper.

Dry fit the lattice into the hole.
Sand to fit.

Glue into the hole with the back of the lattice on your table top.

Cut out the bracket patterns.
Cut two pieces of 3/32" thick basswood.

Glue paper between the two pieces of basswood.

Glue the bracket patterns onto the wood.
Note the way the grain is running for the brackets.

Cut the brackets out.
Do not separate them yet.
Sand the paper off the one side.
Sand the curved edge, soften the outer edge.

Separate the brackets and sand the paper off of the surfaces. Soften the curved edge a bit with the sand paper.

Glue the largest brackets onto the table top.

From 1/16" thick basswood cut a piece 3 3/8" long.
From that piece cut one 1" wide and one 3/4" wide.
Glue a sheet of paper between the two.
Measure and mark where the back posts are.
Note: You have the lattice in the back, the notch is not going to be as deep as the one for the table top. Be sure to measure, if you notice my notches are deep, I re-cut my shelves!

This drives me crazy when I can't get my words next to the picture.
O.K. I have glued the shelves together so that I can cut the notches at the same time. I am dry fitting to make sure the notches are right.

Pull the the shelves apart and sand the surfaces smooth.

Glue the smaller shelf in first. The shelf is glued right up to the bottom of the decorative top.

For the middle shelf I cut a couple of pieces of scrap 1 1/8" long. These will help me get this shelf level.
Glue the middle shelf in and put the scrap pieces under it until it dries.

Glue the brackets onto the shelves.

I've added a little towel rack on the side of the bench.
I am going to use a template for ovals or ellipses.
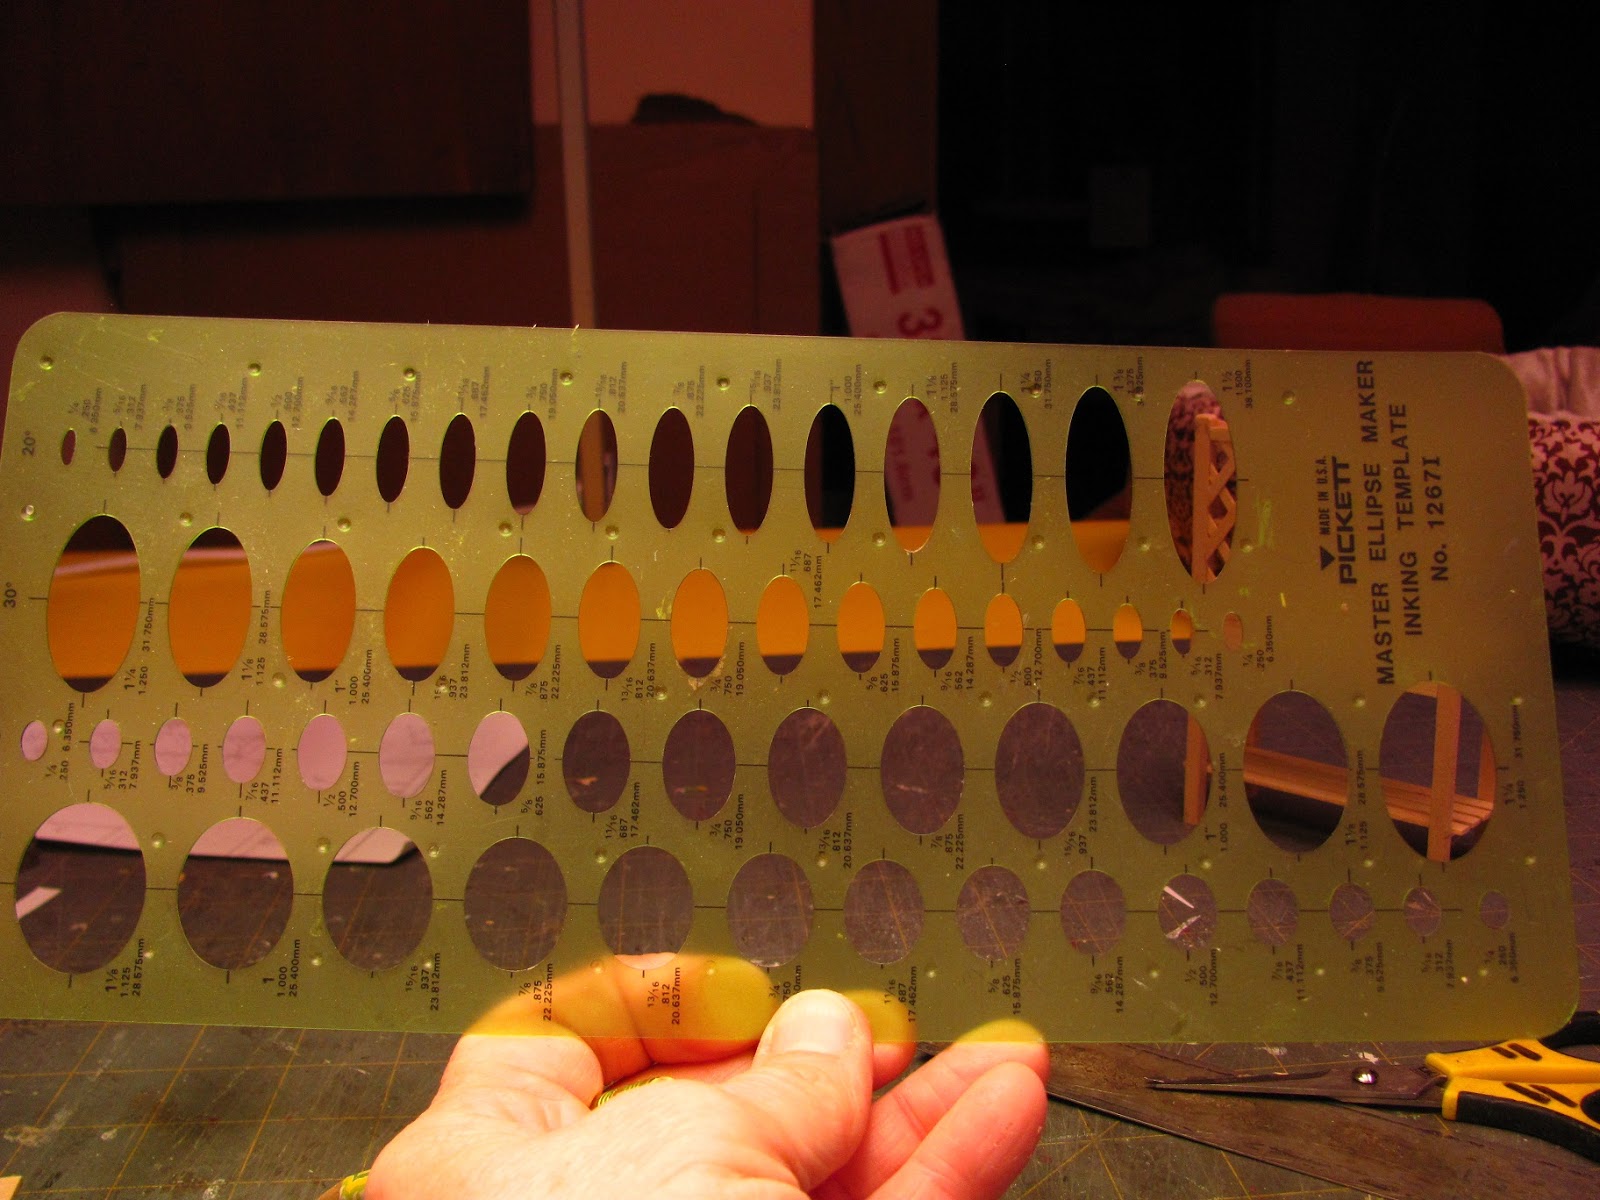
Looks like this.

I am using the 5/6" oval.

Note the grain of the wood to the drawing of the oval.
Trace the oval. Mark the centers.
Drill two holes, this is a 3/32" bit, you could use a 1/16" bit if that's all you have.

Cut a toothpick 1 5/16" long.

Sand the toothpick smooth.
Sand the ends of the toothpick to fit into the holes. You don't have to sand the whole toothpick to fit.

Cut out the oval and sand smooth, I softened the edge a bit, too.

This is tricky, cut the oval in half.
You will probably have to sand the bottom flat, so that it's not leaning to one side.
The bottom needs to be flat to make full contact with the surface of the front and back posts for gluing.
Glue the toothpick into the holes.

Glue the towel rack to the side of the bench.

There you go.
I didn't finish my potting bench/rustic kitchen buffet because I don't know what I will use it for.
Remember, my e-mail address is camceiling@frontiernet.net if you want questions answered or you have a picture for the Follower's Gallery.
Have fun, Expand on it, Make it better . . .
Just keep making minis!
TTUL
Kris
A follower has sent us an absolutely wonderful picture of her finished bench.

If this doesn't inspire you to make this project I don't know what will!
I want to mention something else, see the aqua can on the bottom shelf? The lid is an upside down button with a shank, that's the handle. How cool is that?